Space Travel - Moving entities back and forth between paper space layouts and model space
>> The Challenge:
You want to create a .BMP or a .WMF file so you can show all or part of your drawing to other people.
>> The Reality:
As revealed in the previous two tips, the DWGeditor® functions for extracting bitmap (.BMP) or Windows MetaFile (.WMF) files only operate on entities that reside in the current space, be it a paper space layout or model space. The preferred practice normally is to draw the part or assembly in model space and then to apply the annotations such as border, title block, notes, and dimensions in a paper space layout. The problem is that when you extract the part or assembly you don’t get the dimensions and other annotations.
>> The Solution:
The process required to move entities to the other parallel universe is quite simple. Most of the time the logical approach involves moving annotations and dimensions from the layout to model space.It is probably a good idea to Save the current state of the drawing before proceeding.
If you don’t know it already, the first step is to determine the viewport scale factor.
- If the viewport is on a frozen layer then thaw it so the viewport can be seen.
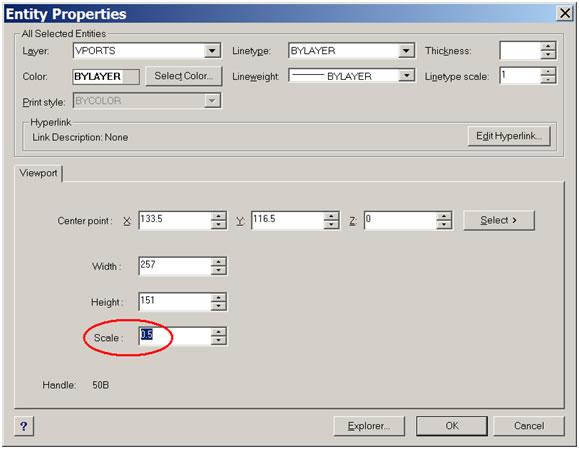
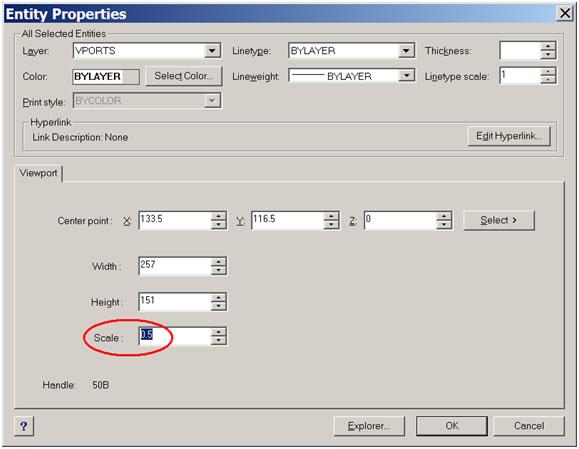
- Double-click on the viewport border to bring up the Entity Properties dialog box.

Figure 1: Use the Entity Properties dialog box to determine the viewport scale
- Note the value in the Scale window down near the bottom of the dialog box.
- Click OK to dismiss the dialog box.
You are now ready to set up the actual transfer.
- Start the Block command.
- Supply a suitable name, such as ChangeSpace.
- Pick a logical insertion point. This is a point that can be defined by using an object snap in both the layout view and in model space, remembering that object snaps can reach through the viewport to model space. A good choice would be something like the center of a circle on the part or assembly.
- Select the entities to be transferred. When you have finished the selection process they will disappear from the layout.
Now it’s time to perform the actual transfer.
- Start the Insert command by entering it from the keyboard.
- Enter the previously-assigned transfer block name.
- Snap to the same insertion point that you used when defining the block.
- For a scale factor, enter the inverse of the viewport scale that was determined in step 3. For example, a viewport scale of 0.5 requires an insertion scale of 2.0 for both the X and Y directions.
- Use a rotation angle of 0 (zero).
Success! You have transferred the annotation entities from the paper space layout to model space. You can now use the Extract command to create a .BMP or a .WMF file that shows everything.
>> Notes for You:
Unfortunately, you have now messed up the original drawing file in that all your annotations exist within a single block insertion in model space and have disappeared from the paper space layout. That is why I suggested that you Save the drawing just before you start, so that you can now Quit the drawing without saving your changes.
I know that you would never make a mistake, but what if someone else did the transfer without making a backup and then saved the revised drawing? No problem; you can salvage things by deleting the transfer block from model space, re-inserting it in the paper space layout, and then exploding it. To be neat and orderly you should also Purge the now-unused block definition.
In step 5 I suggested entering the Insert command from the keyboard. You can also use the menu sequence Insert > Insert Block… which invokes the DdInsert command, which uses a dialog box. In this box you need to uncheck the Position Block When Inserting button, enter the X and Y scale factors, and then click the Select button to pick the insertion point.

Figure 2: Use the Position block when inserting option of the DdInsert command The basic process can also be run the other way, to transfer the border, title block, dimensions, and annotations from model space to a layer space layout.
>> Command Review:
- Block:
Keyboard: block
Menu: Tools > Create Block
Toolbar: Tools > Create Block
- Insert:
Keyboard: insert
- DdInsert:
Keyboard: ddinsert
Menu: Insert > Insert Block…
Toolbar: Draw 2D > Insert Block…
- Purge:
Keyboard: purge
Menu: Tools > DWGeditor Explorer> Purge
- Export:
Keyboard: export
Menu: File > Export to file…

