>> The Challenge:
Do you find yourself doing the same tasks over and over again? This is particularly true when starting a new drawing. You need to set up your layers, your text and dimension styles, your border and title block, and so on. Worse yet, you sometimes make typing errors so that layer names are not consistent within a group of drawings.
>> The Reality:
Customizing can eliminate a great many repetitive tasks and improve consistency, but you are not a programmer.
>> The Solution:
How would you like a Caribbean vacation, or perhaps a ski week at Whistler? You’ll learn later how you can afford either one. All it takes is a bit of customizing.
The minute you hear “customizing” a lot of you will roll your eyes, mumble something about not being a programmer or that your CAD manager handles that, and will tune out. Well, tune back in because you can save at least 20 minutes per drawing. This is particularly appropriate if you work alone because you don’t have a CAD manager to do it for you.
The best part is that you don’t need to learn anything about programming or macros. In fact, you don’t need to know any more than you already do except for a few minor details:
When you start a new drawing, you actually start from a copy of an existing file. This file is known generically as a “template”.
You can easily create custom templates that include things like pre-defined layer names and specifications, text styles, dimension styles, borders, title blocks, and so on.
You can specify the folder location where template files live.
You can specify the default template file name.
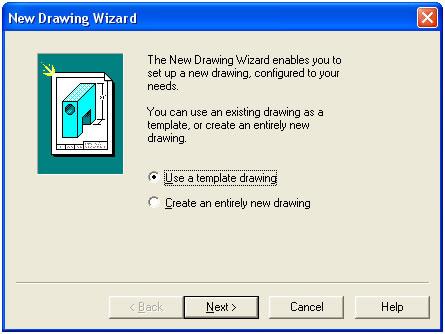
Let’s look at these in a bit more detail, starting with item a. There are two basic commands for starting a new file. Selecting File > New launches the NewWiz wizard, whereas selecting the New button on the Standard toolbar starts the New command.

Figure 1: The New Drawing Wizard lets you choose between a blank file and a template file.

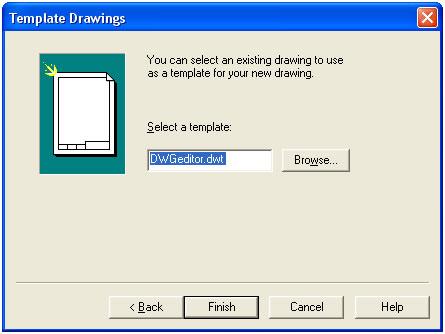
Figure 2: If you select Template in the wizard, you then browse for a suitable file.
The NewWiz wizard lets you choose between Use a template or Start an entirely new drawing. If you select the first choice, then you can browse for a suitable template file whereas the second choice walks you through a series of prompts regarding units and other things. New is keyboard-driven and simply asks for a template file name.
Now let’s move on to item b.
How easy is it to create a template file? Very easy. Actually, there are two ways, both equally easy.
The first way is to start a new drawing and set it up the way you want. This can include layer names and specifications, text styles, dimension styles, block definitions, title blocks and borders, and so on. In short, you can include anything that can go into a normal drawing, including external references (XREFs). In the context of templates, XREFs are particularly useful for borders and title blocks because they load from a single external file each time instead of being duplicated over and over again in each new drawing.
Setting up a template file will usually take at least 20 minutes, and maybe somewhat more.
When you are finished, start the SaveAs command (File > Save As…) and select Drawing Template (.dwt) from the Save As Type drop list. Browse to a “suitable” location and save your file using a “suitable” name. We’ll come back to “suitable” in a moment.
G, that’s Great!
The second way to create a template file is to use Windows Explorer to simply rename an existing drawing file. That’s right; the only difference between a drawing and a template is the fact that a drawing has the .dwg extension while a template has the .dwt extension. For simplicity, you’ll probably want to move the file to our “suitable” location.
Now let’s look at items c. and d. to find out what “suitable” means.

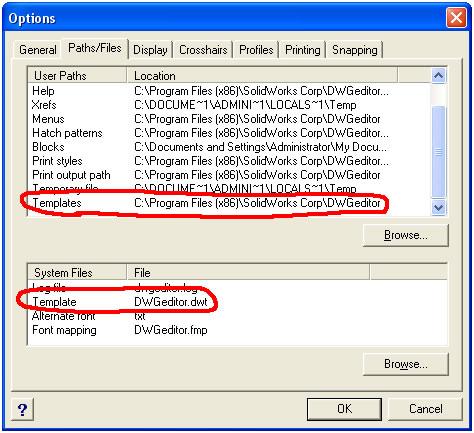
Figure 3: The Options dialog box is used to change the default template file name and location.
Start the Options command (Tools | Options) and click on the Files/Paths tab. A bit of quick exploring will soon reveal that you can specify both the folder location for your templates and the default file name. Logical choices would be to point the folder location to a Templates folder within the usual My Documents folder and to use the file name you used when you created or renamed your template. This makes sure that everything will get backed up when you do your regular backup of your data files.
Notes to you: When you select Start an entirely new drawing in the NewWiz wizard, or if you just press Enter in response to the New command, you actually start from the default template file.
By default, the default template file name is DWGeditor.dwt and it lives in the same folder as the main DWGeditor program. This is usually c:\Program Files\SolidWorks Corp\DWGeditor\, but as indicated earlier you’ll probably want to change these settings.
When you launch DWGeditor® it starts a new drawing. This drawing starts from the default template name and location as specified by the Options command.
You can, and probably should, create specific, custom templates to suit individual clients, projects, disciplines, sheet sizes, and so on. You can easily change the default as you switch from project to project or from client to client.
If you are working in a network environment, then the template folder should be located on a network drive so that everyone is using the same template. In a small office, this can be as simple as setting up a shared folder on one machine and setting a suitable My Network Places on the others. This is viable for as few as two machines; in fact, you can set up your laptop to point to your workstation machine. If you happen to be away from home when you start a new drawing, then DWGeditor gently complains that the network drive is not available and will ask you to browse to a local template.
If it took you at least 20 minutes to set up your template file and if you put it on the network, then from now on everyone in your office will save at least 20 minutes every time you start a new drawing. As an added bonus, it will be much easier to enforce CAD standards because your standard layer names, specifications, etc. are already defined in any new file.
See? You can save at least 20 minutes per drawing through customization, and you don’t need to learn macros or programming. Now for the vacation; 20 minutes per drawing at a nominal charge-out rate of $60/hour times 100 drawings/year equals $2,000, which should make a very good start at paying for the vacation…
>> Command review:
- New:
- Keyboard: new
- Toolbar: Standard > New
- New wizard:
- Keyboard: wiznew
- Menu: File > New
- Options:
- Keyboard: options, then Paths/Files tab
- Menu: Tools > Options… > Paths/Files
- Save As:
- Keyboard: saveas
- Menu: File > Save As…

